 HOW DID YOU MAKE MONITO?
Contrary to what it might look at first, Monito isn't made with Macromedia Flash, or any other commercial animation software. (And, no, we're not the same people who make South Park. ;) Monito was built using a proprietary animation program called CelMagic. CelMagic allows us to layer many images in a sequence from background to foreground and manipulate the properties of the animation cels for each frame of the animation. It's similar to the way traditional cel animation works, but I can do everything from within one program. It also has the ability to sync animation up to a prerecorded soundtrack so the voices and sound effects always match up. (The first episode in particular was little more than an experiment to see if we could pull it off. The software came first, the cartoon came afterwards.)
Generally, the first phase of making the animation is coming up with an idea for what's going to happen. For episode 3, we had a cool dry-erase whiteboard that we drew storyboards on, but we didn't really do any storyboards for episodes 1 and 2.
After we have an idea for what's going to happen in the scene, the next phase of the animation production is to record the soundtrack. We don't have a recording studio or anything, everything's just recorded using the little crappy microphone that came with my old computer. (In some scenes, this is actually really obvious...) FYI, the recording software we like to use is called GoldWave.
The next step is to draw all of the backgrounds and animation cels that we need for a certain scene. By "animation cels," I'm not referring to actual celluloid panels like they use in traditional animations, I mean pieces of paper with characters and backgrounds drawn on them. How many layers and what each layer has varies from shot to shot, but generally there's at least one background layer and one character layer. For shots where a character is talking, sometimes we'll have an extra layer for the mouth and possibly one for the eyes. If something needs to come in from of an object (for instance, if a character needs to walk behind something) we can need to add another layer on top. Figuring out how to set up the layers and stuff for each shot is more of an art than a science, and for any given shot there are probably a million different ways to set it up.
After we make all the drawings we need for a certain shot, we scan them into the computer. Everything is dithered to black & white, sized to fit the dimensions of the video (600x336 pixels) and then colored. To color the animation cels in Monito, we use a piece of high tech state of the art software called Microsoft Paint.
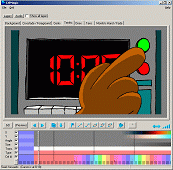
(Click on the picture to get a bigger image.)
When it's time to do the animation, we fire up CelMagic, the program I created (with help from Ted Kelly.) The coolest feature of CelMagic - in fact, the whole reason I created it in the first place - is that you can highlight an area in the timeline and preview what's happening in the soundtrack at that point. So we can always do the soundtrack first and get the pacing the way we want it, and then we can sync up all of the animation to the audio. This is how we're able to make the mouths of all the characters move in sync with what they're supposed to be saying, and it also allows us to do scene changes in the right places and have sound effects and music synched up with the action of the video.
The ins and outs of CelMagic are a bit too complicated to explain here (hell, I had a hard enough time just explaining it to John; after all, I originally only wrote the software for my own personal use, and nobody else needed to know what the hell all the buttons did) but essentially I have multiple layers for which I can set which cel to use on a specific frame (for instance, an "E" mouth for when a character is saying "E" and then an "O" mouth on a different frame when they're saying "O".) Then I can move the cels around on the screen and use various interpolation techniques to make everything move around smoothly.
After everything looks good in CelMagic, we render everything to an AVI file. Then I can watch the final animation and see if everything is synched up to the audio correctly and if I need to go back and change anything.
I'd just like to say, the thing I love about doing animation this way is that there isn't anything that I can't go back and redo. With the clay animation stuff we were doing in high school, if you seriously messed up, you'd have to redo an entire scene, but with this technique we can go back and change any frame in the animation at any time. For two scenes in episode 3, we recolored all the background in the entire scene on a whim to see if it would look better, and we didn't have to actually re-animate anything.
Anyway, once a shot is finalized, I render it with high quality anti-aliasing (pseudo-anti-aliasing, actually; it uses a smoothing algorithm that I created specifically for CelMagic), and once all the shots for a scene are done I put it all together with a program called Virtual Dub.

